

Act 1 - The Submerged Passage
12 / 7 / 2019
# Previous Area
# Intro
In this guide our subject is The Submerged Passave, the fourth zone of act 1.
There is a total of 6 distinct layouts for this area. Each of the layouts can be recognized almost immediately first by looking at the orientation of the entrance, and then how the area opens further. While not every area can be recognized immediately, they can be cleared following a pattern that will minimize backtracking and not cause you to run to dead ends.
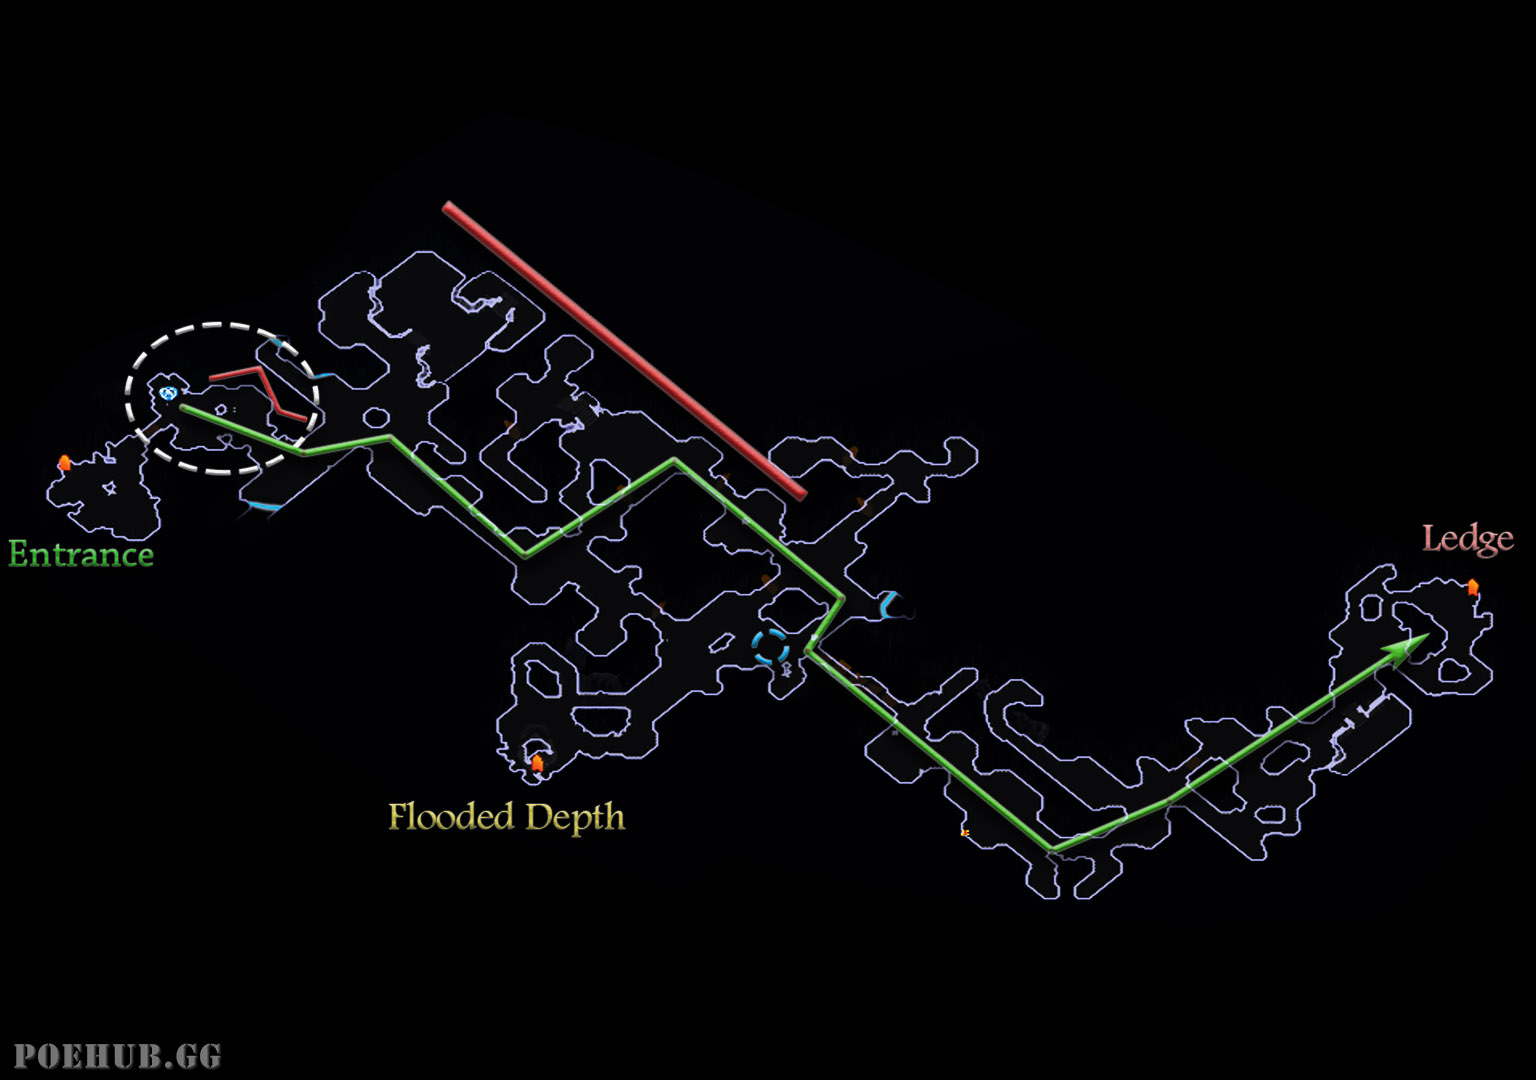
The entrance to The Flooded Depths (side area with a quest for skill point) is always in the same location in every layout.
# Stairs
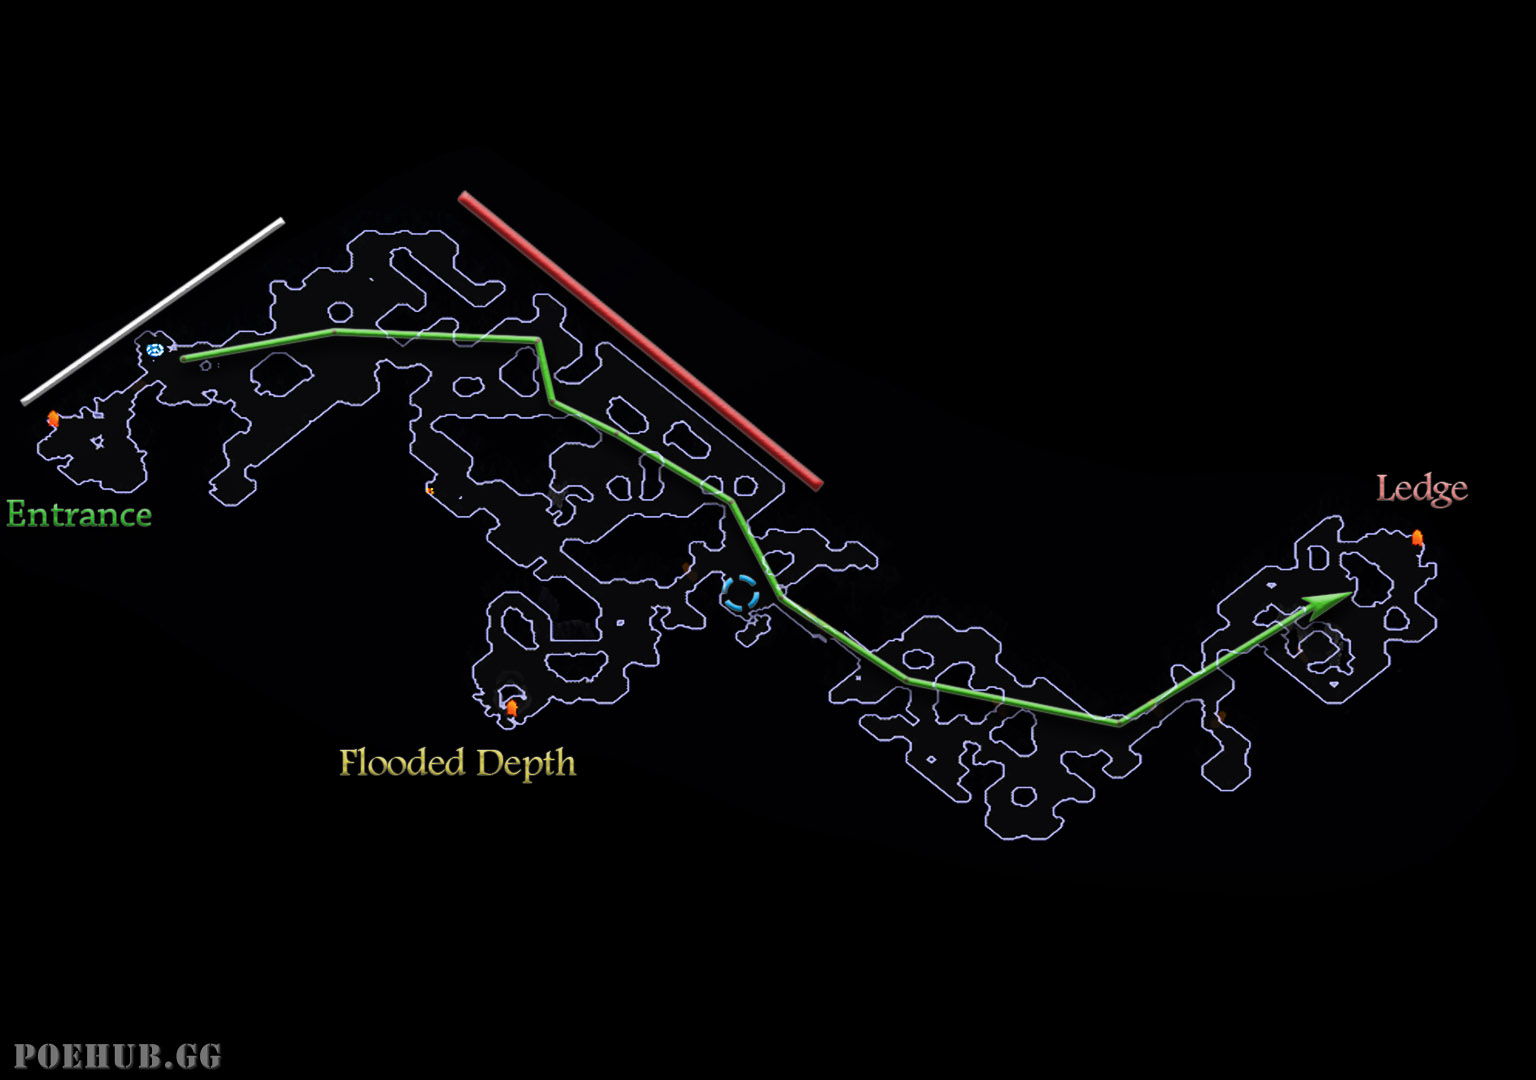
Before we start talking about orientations and individual layouts, it's important to mention the stairs that are in every layout of Submerged.
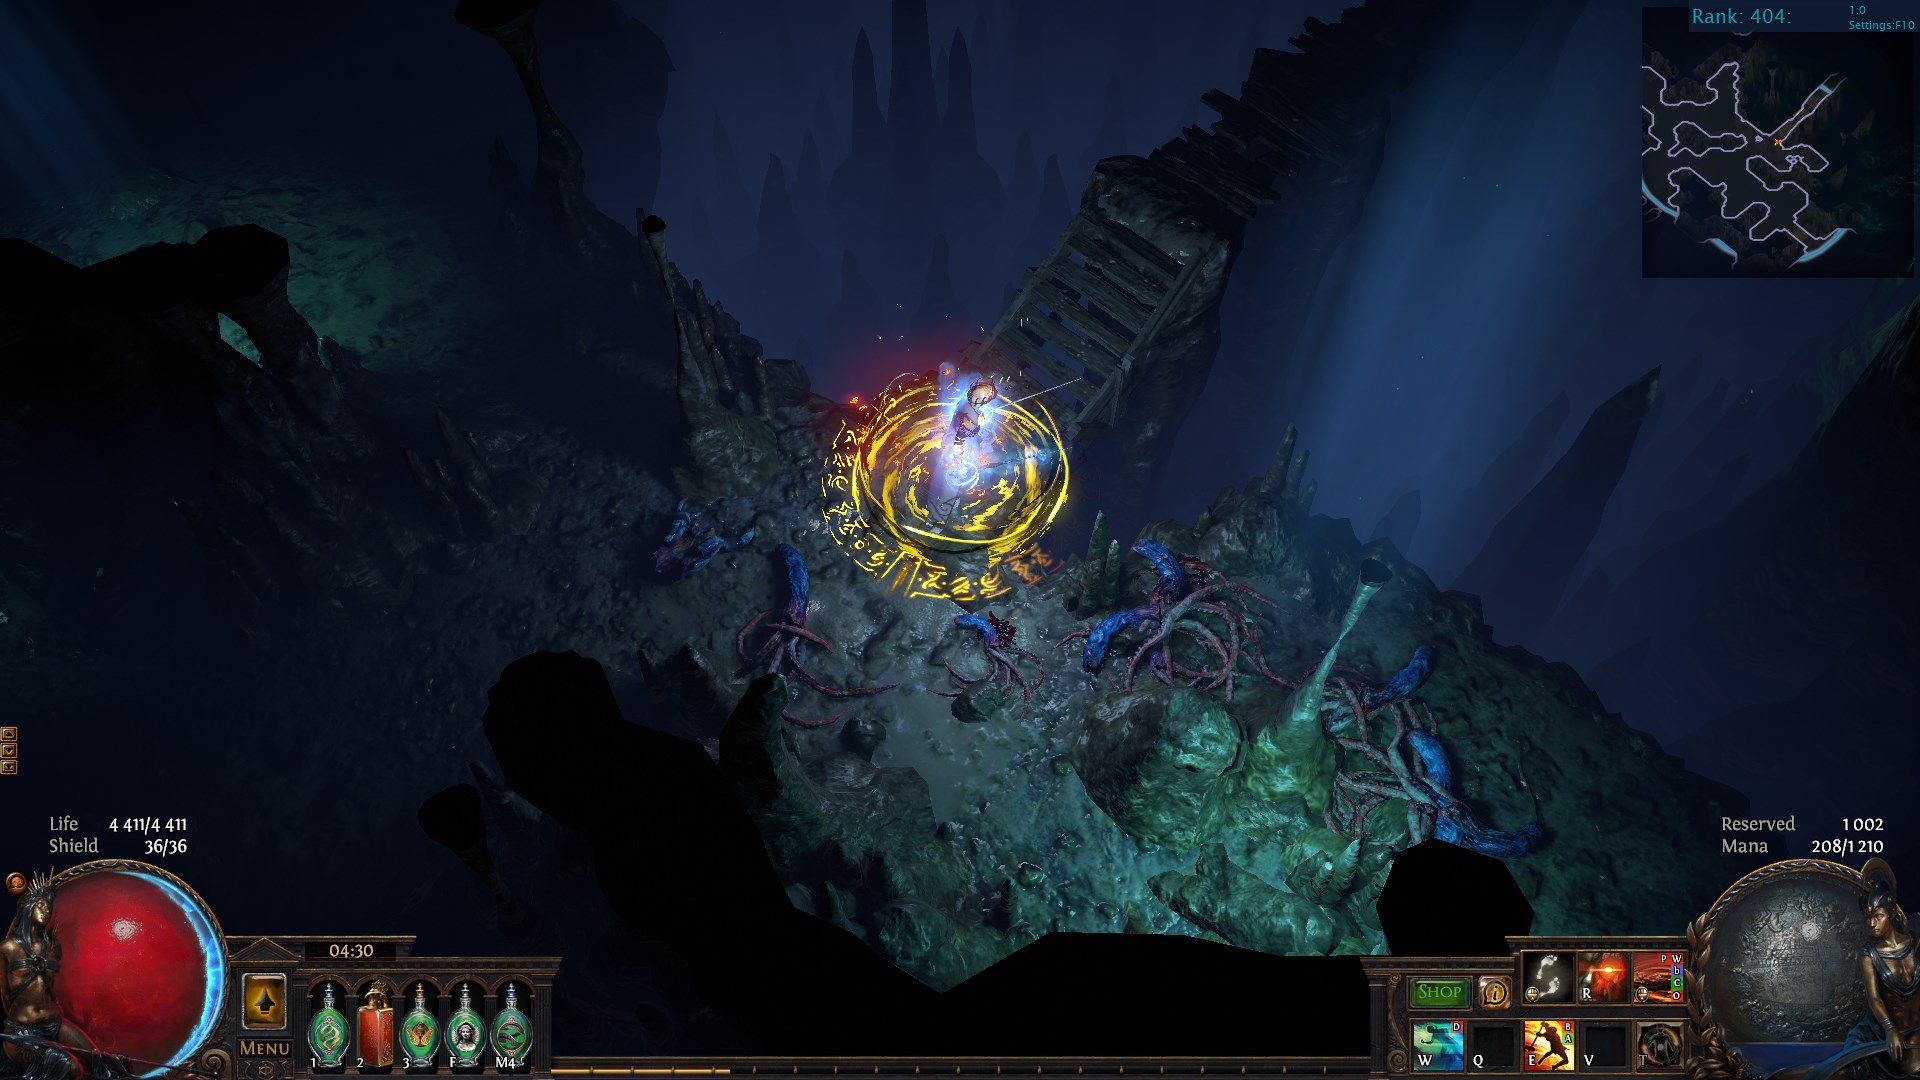
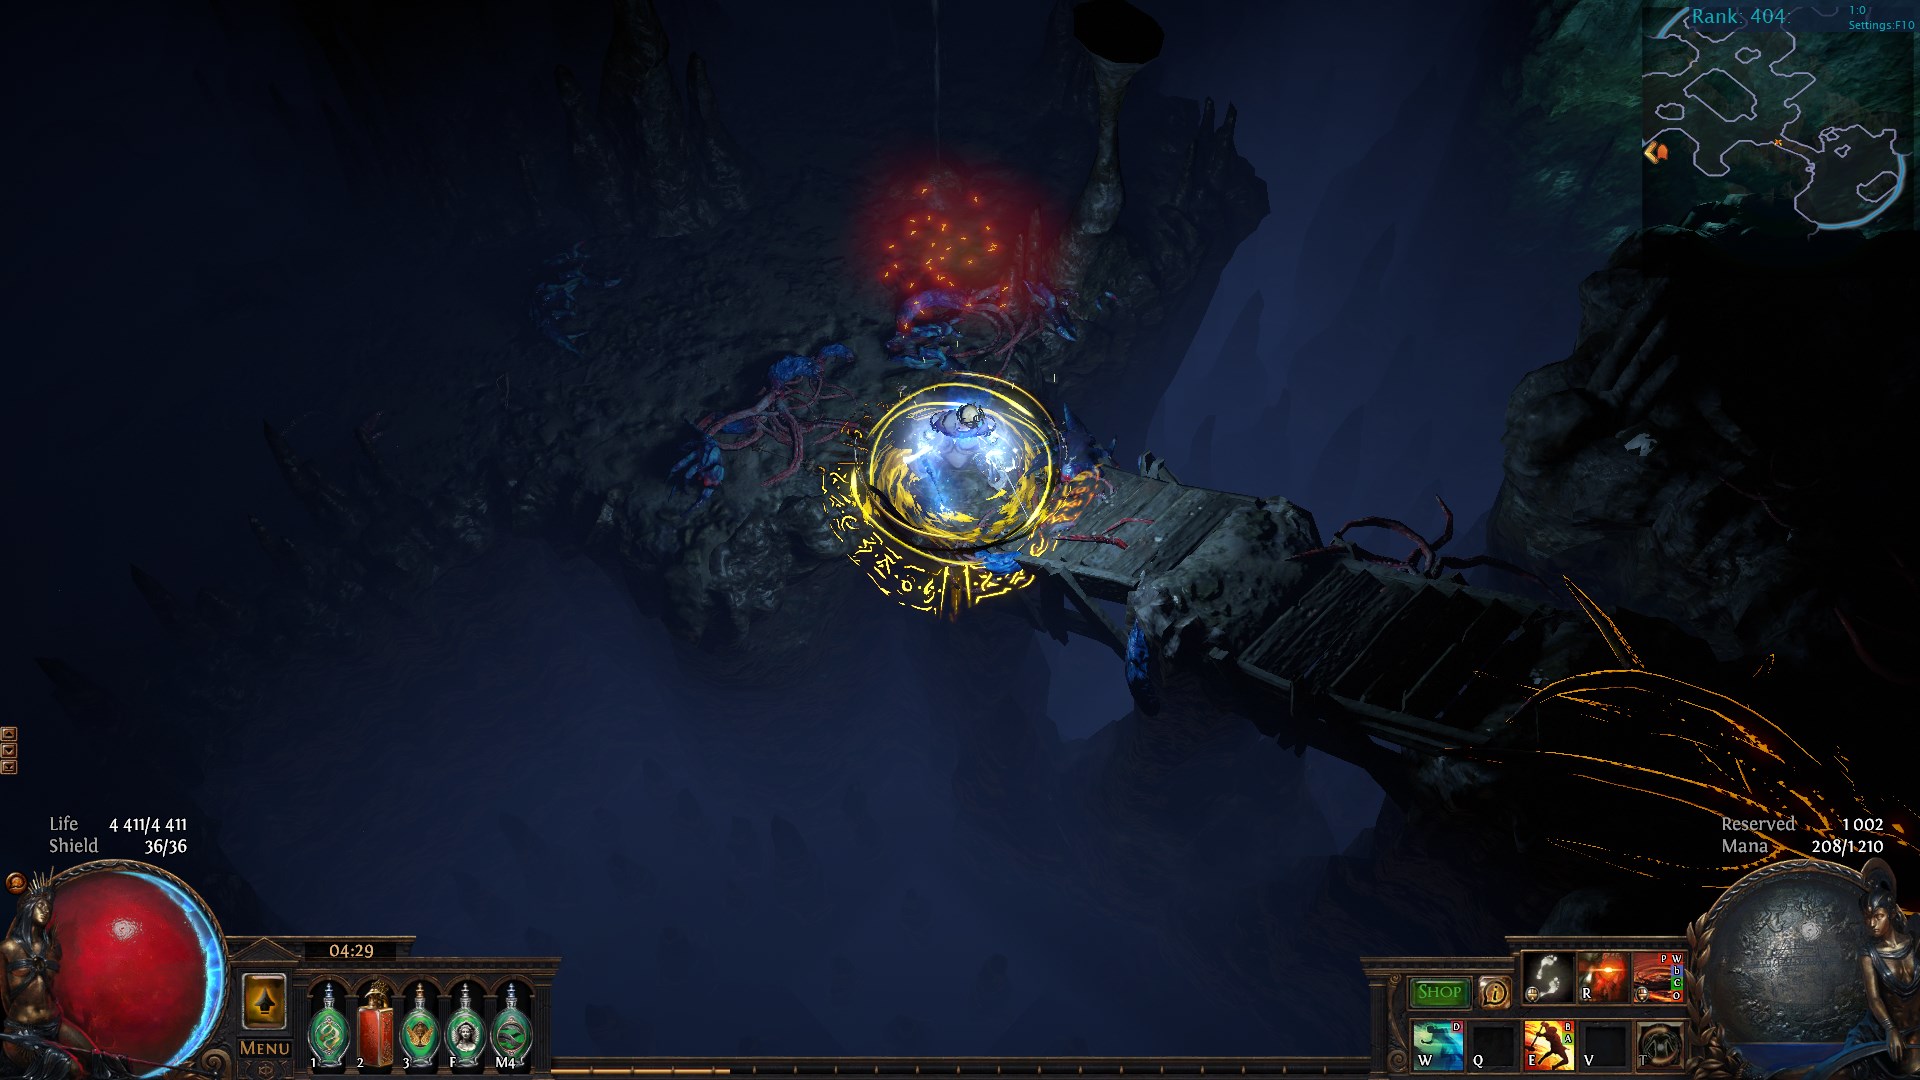
The character always climbs them upwards (even though in the middle image above we're actually going South-East).
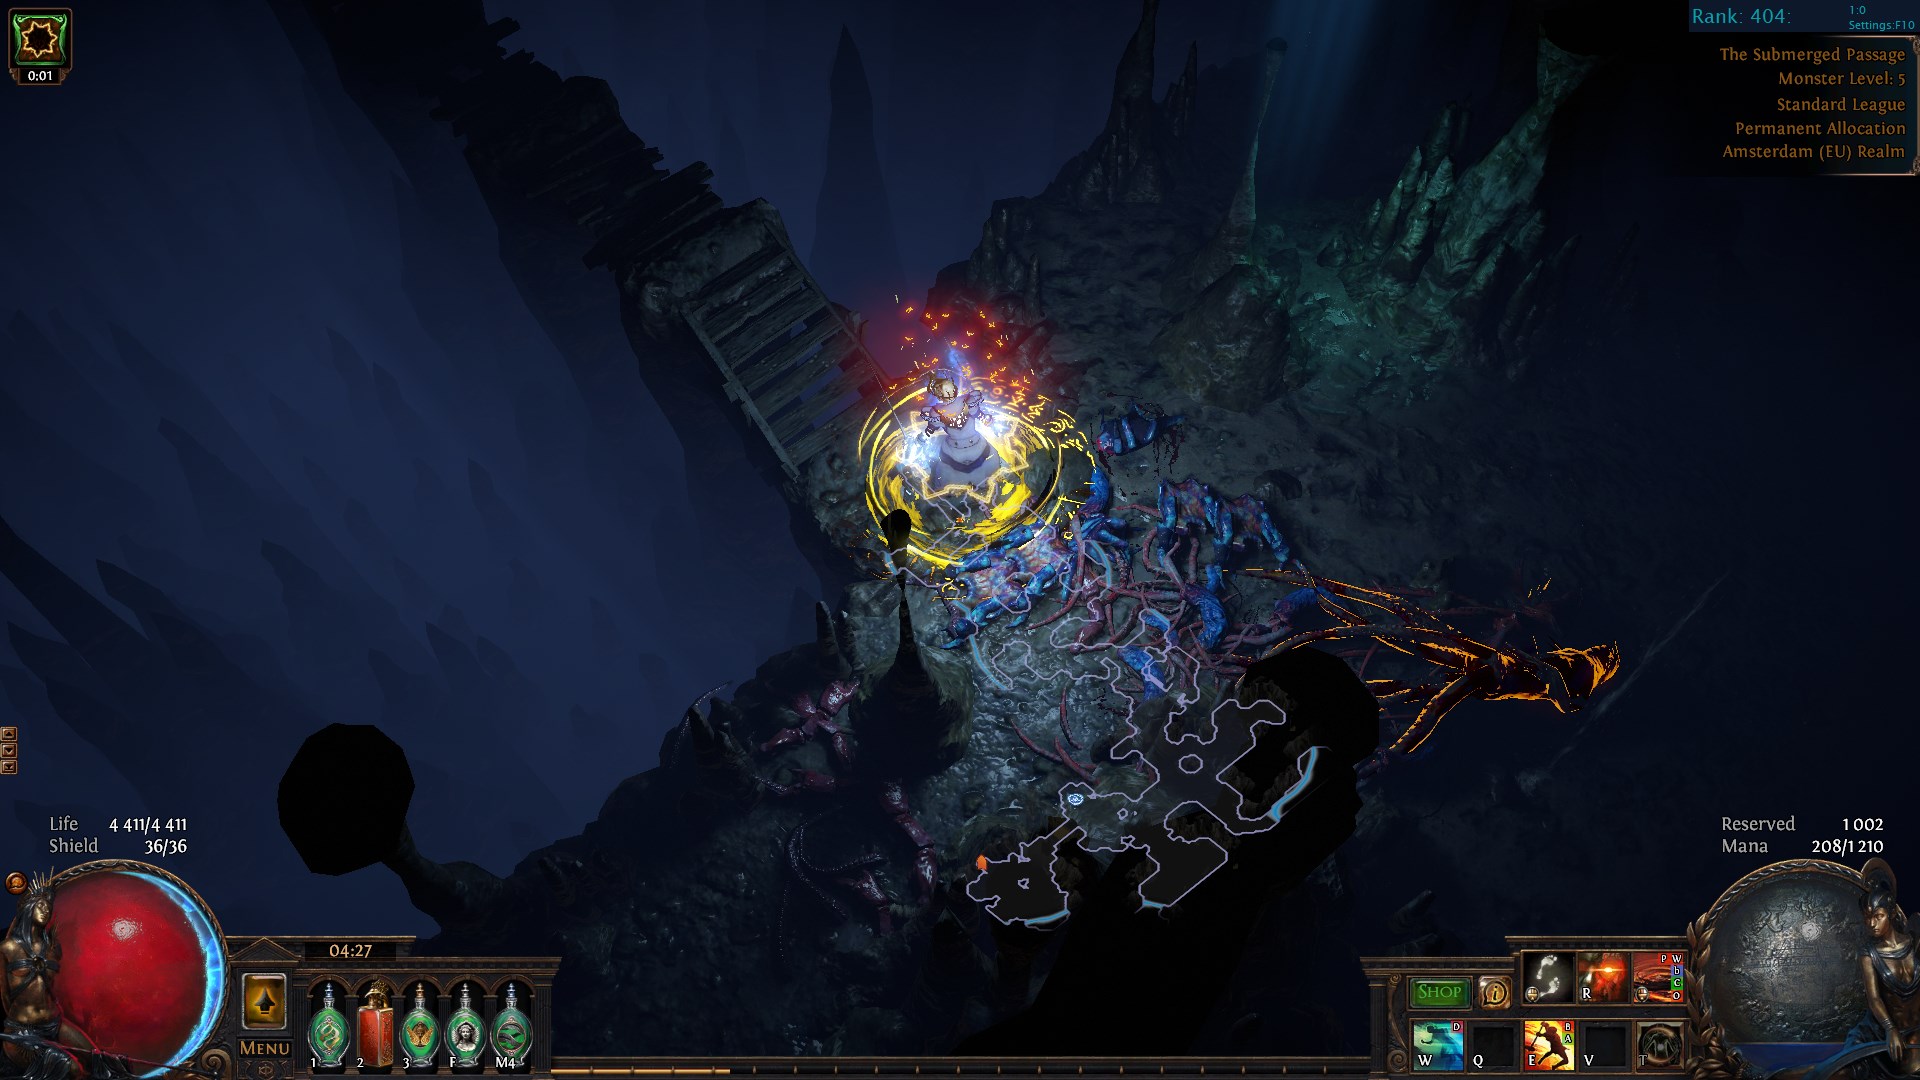
This is a common place to open a portal as it is relatively close to The Flooded Mines, and you can then just continue your way to a waypoint and return to The Submerged through the portal you opened and proceed to The Flooded Mines for your skill point side quest. This saves you quite some time you'd otherwise spend travelling.
# Orientations
Shown below are the two different starting orientations for this area:
- While both of the starting positions start with us facing down to South-East from the entrance, the character is either above or below the waypoint.
The layouts are evenly split between to the two orientations, each of them having 3 different layouts.
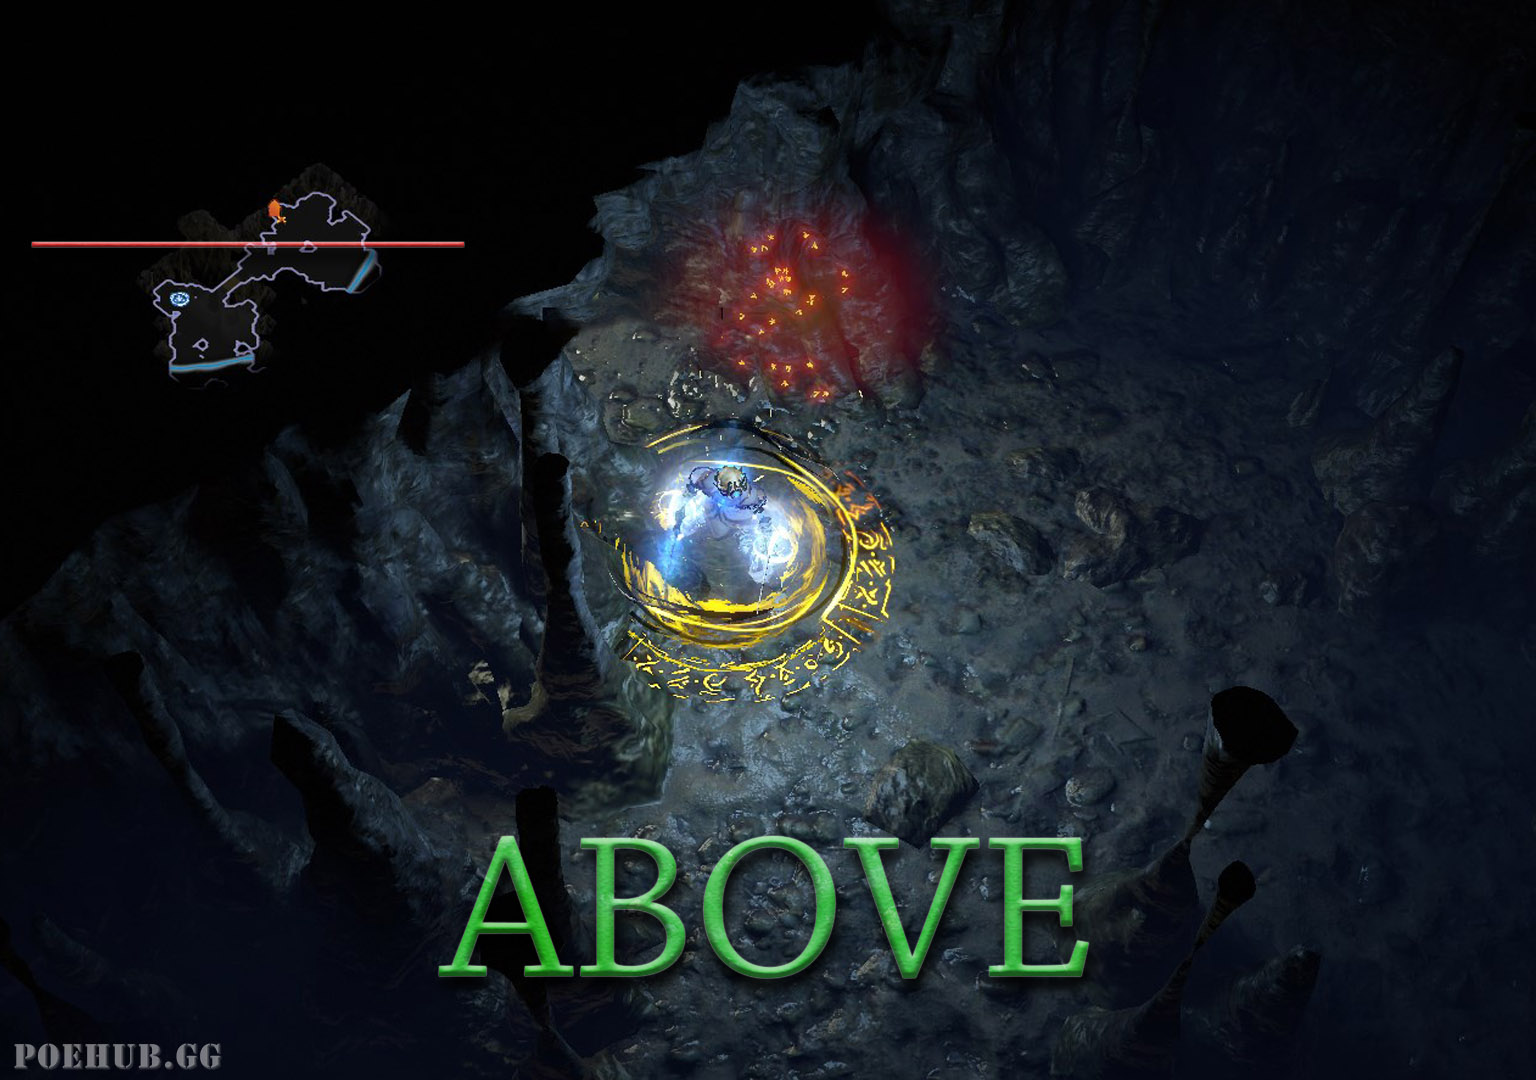
# Above
In the 'above' layouts you want to check what is (or isn't) generated to the South-West of the waypoint room. From there you can very quickly tell what layout you are in, however there is some potential for a some misread in this area we discus later.
When starting above the waypoint, you now only have to worry about 3 different layouts, which in this guide we refer to as:
- Bottom
- Right
- Left
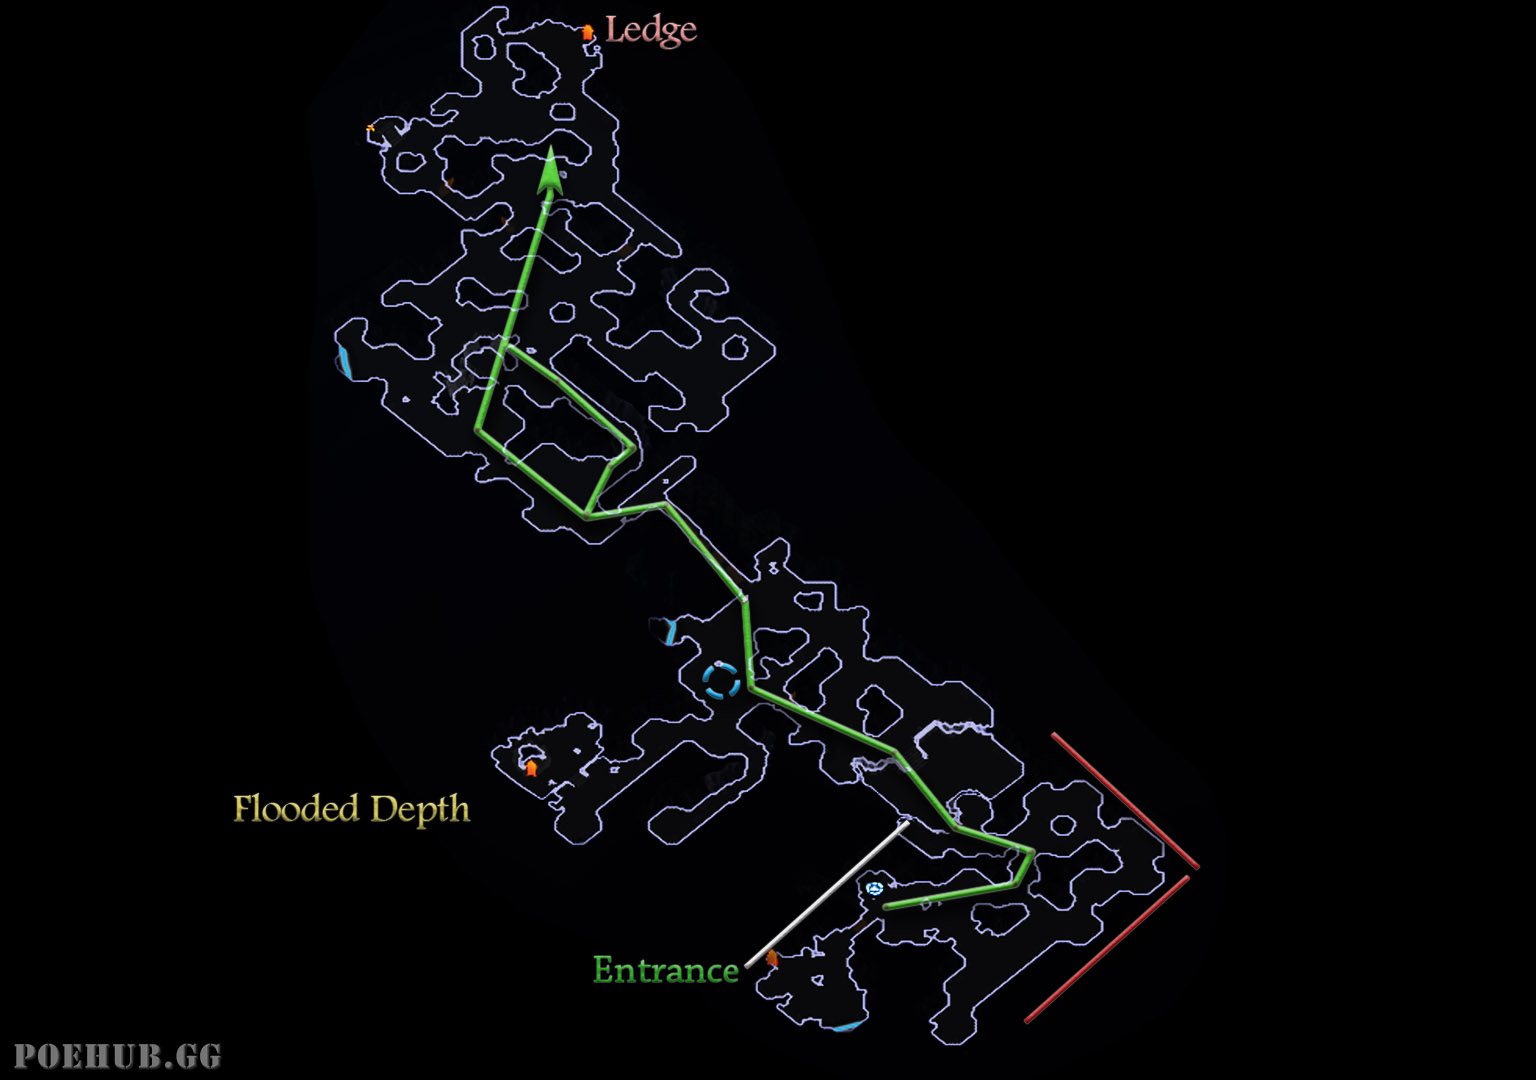
# Bottom
(Above)Bottom layout is named based on the exit being South of the entrance. Stairs in this layout are always towards South-East.
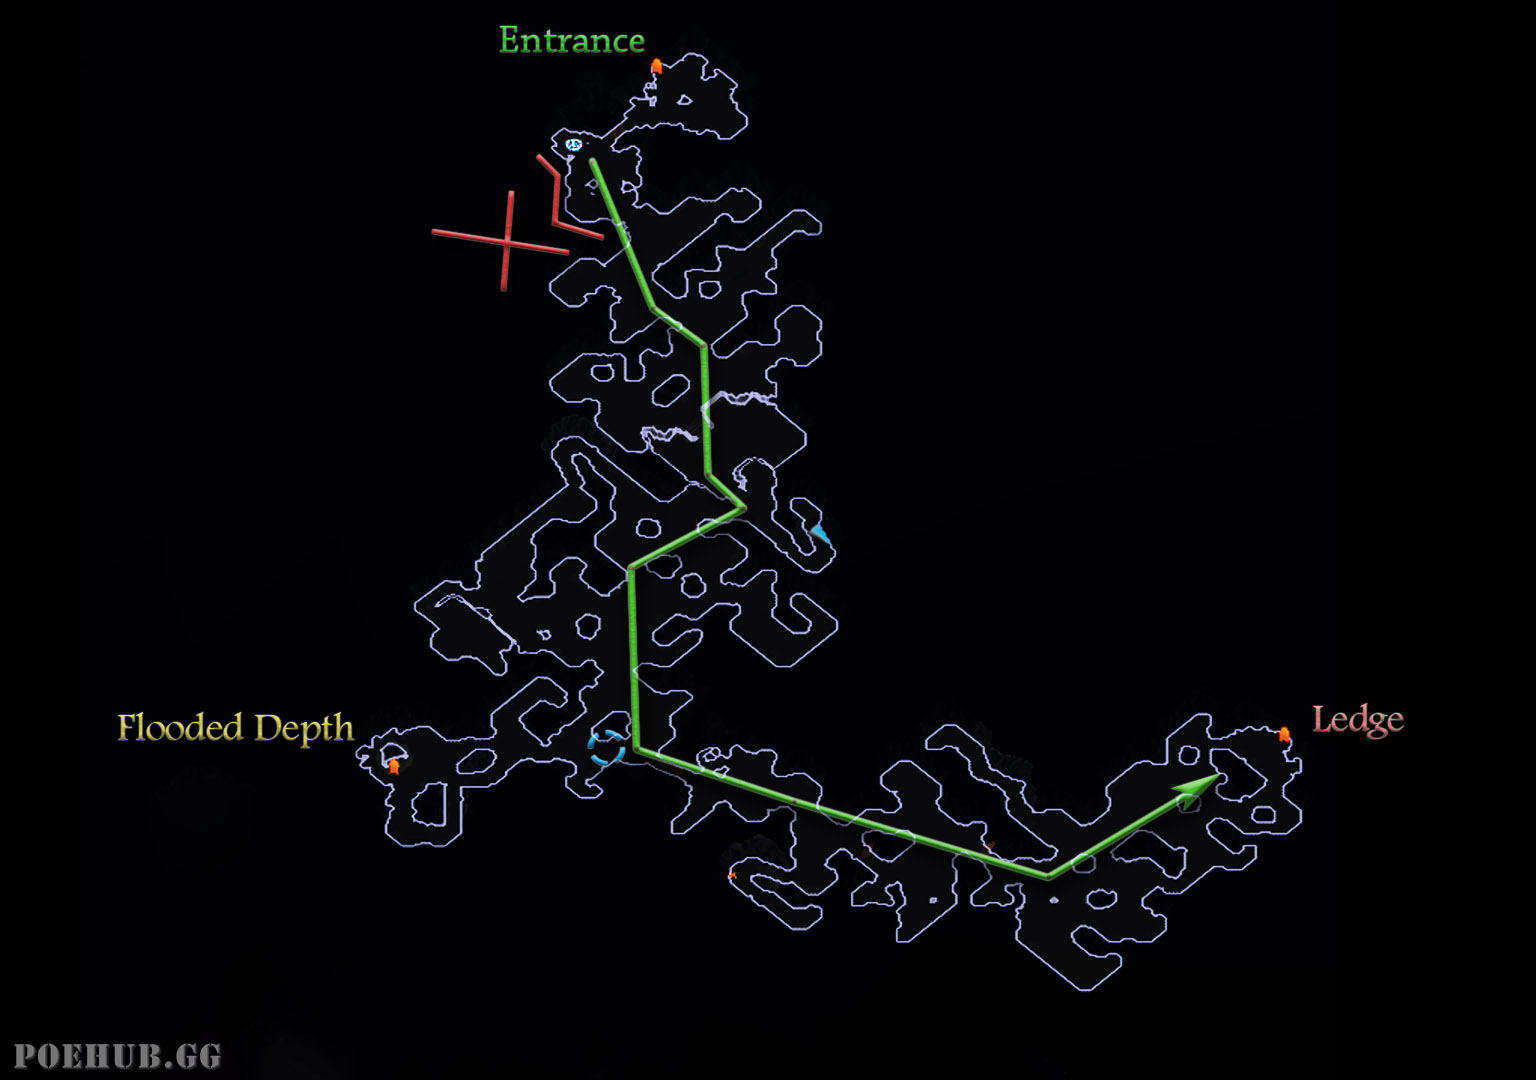
- In the Bottom layout the waypoint room always only connects to another room in the South-East side, and to it's South-West side (behind the wall) there is never anything.
- From here you want to travel towards south and if you're unsure if you should take a turn to the South-West or South-East before you encounter the stairs, you should always turn to the left (South-West)
- Blue circle shows the location where you should open your portal if you're planning to come back to this area later for the skill point.
- After stairs, you usually need to keep going South-East for a tiny bit but the general direction is East.
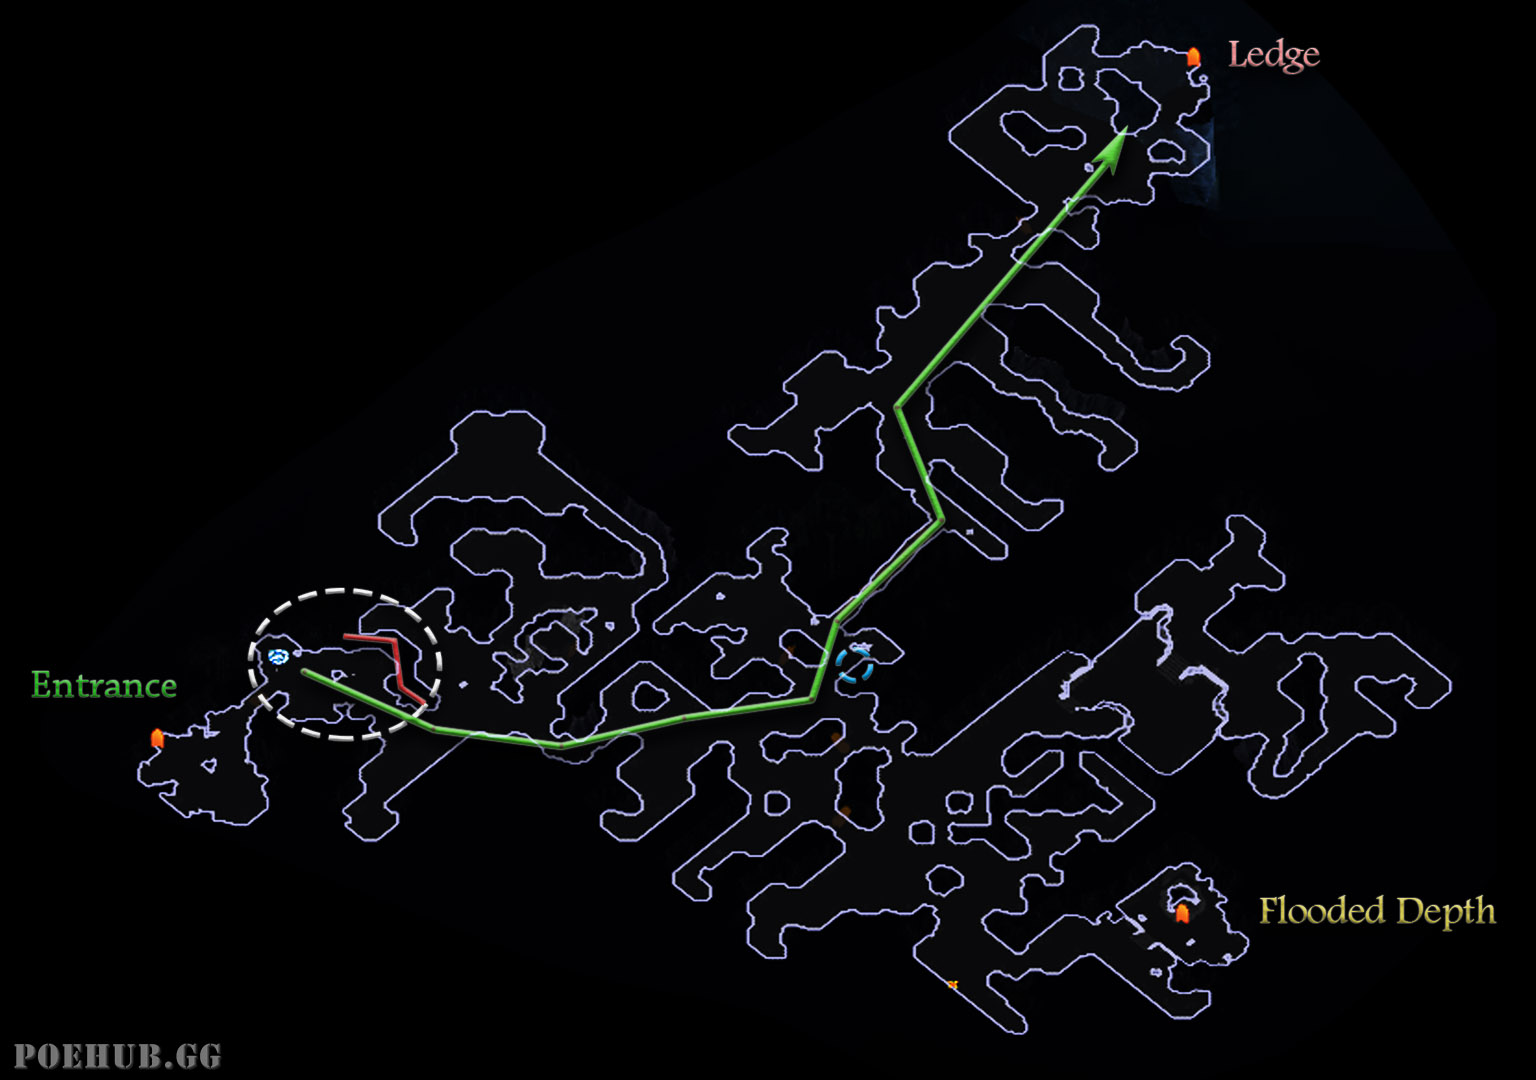
# Right
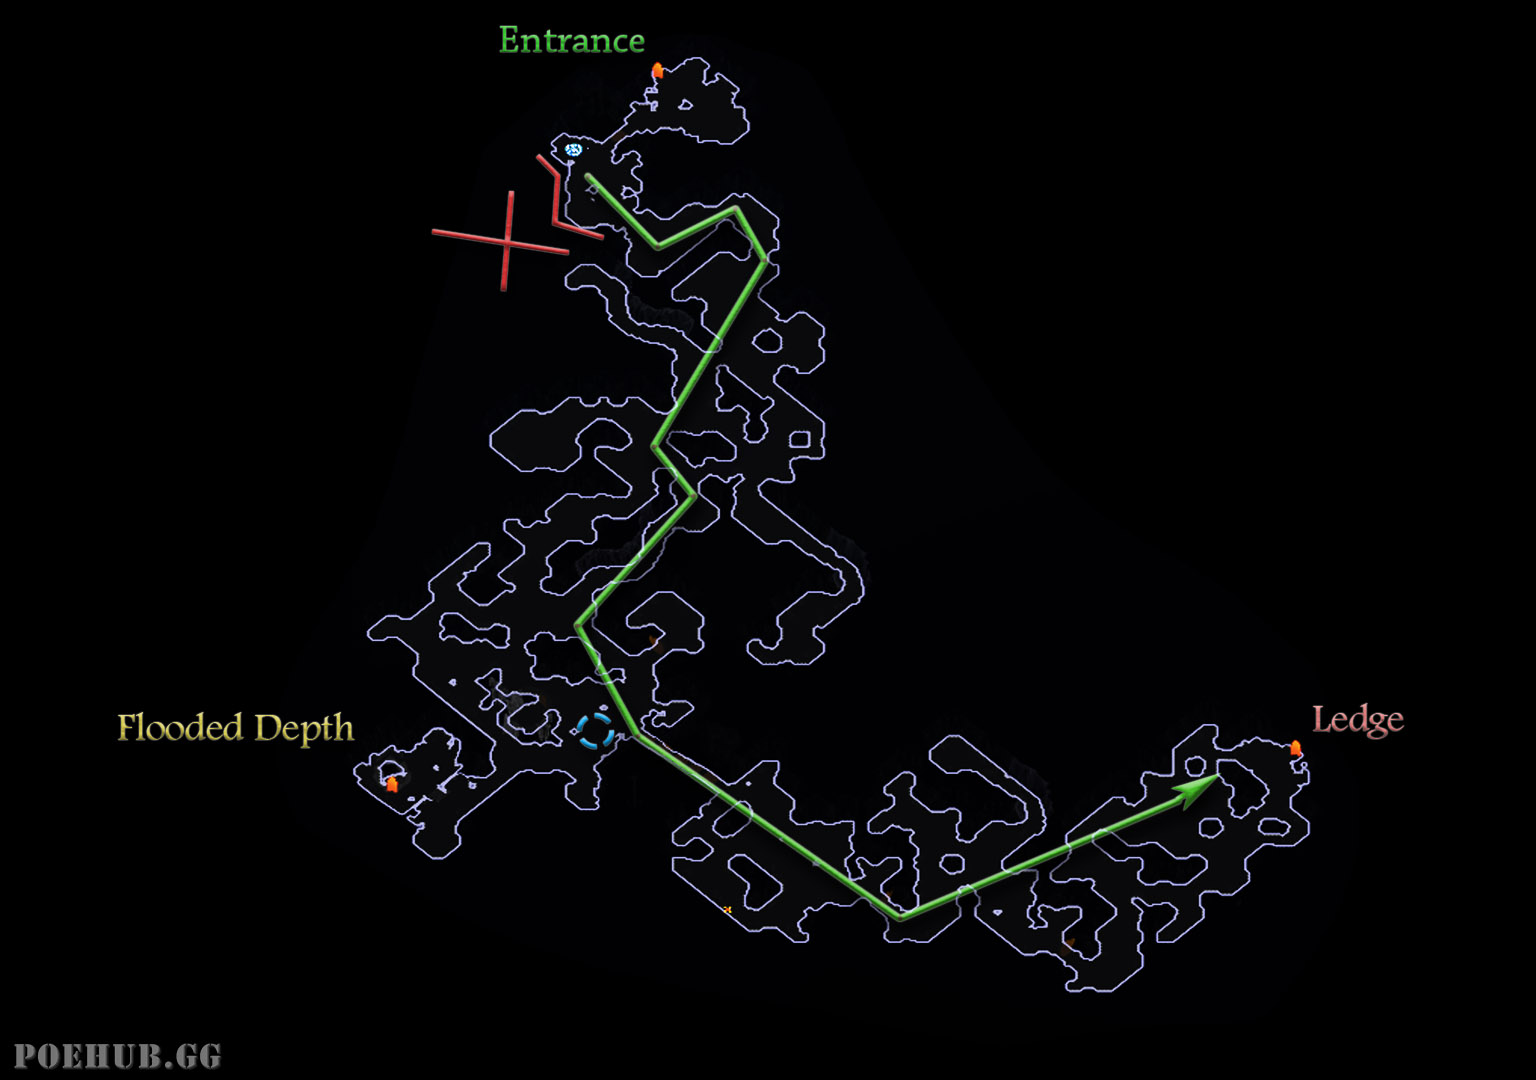
(Above)Right layout is named based on the exit being to the East of the entrance. Stairs in this layout are always towards North-East.
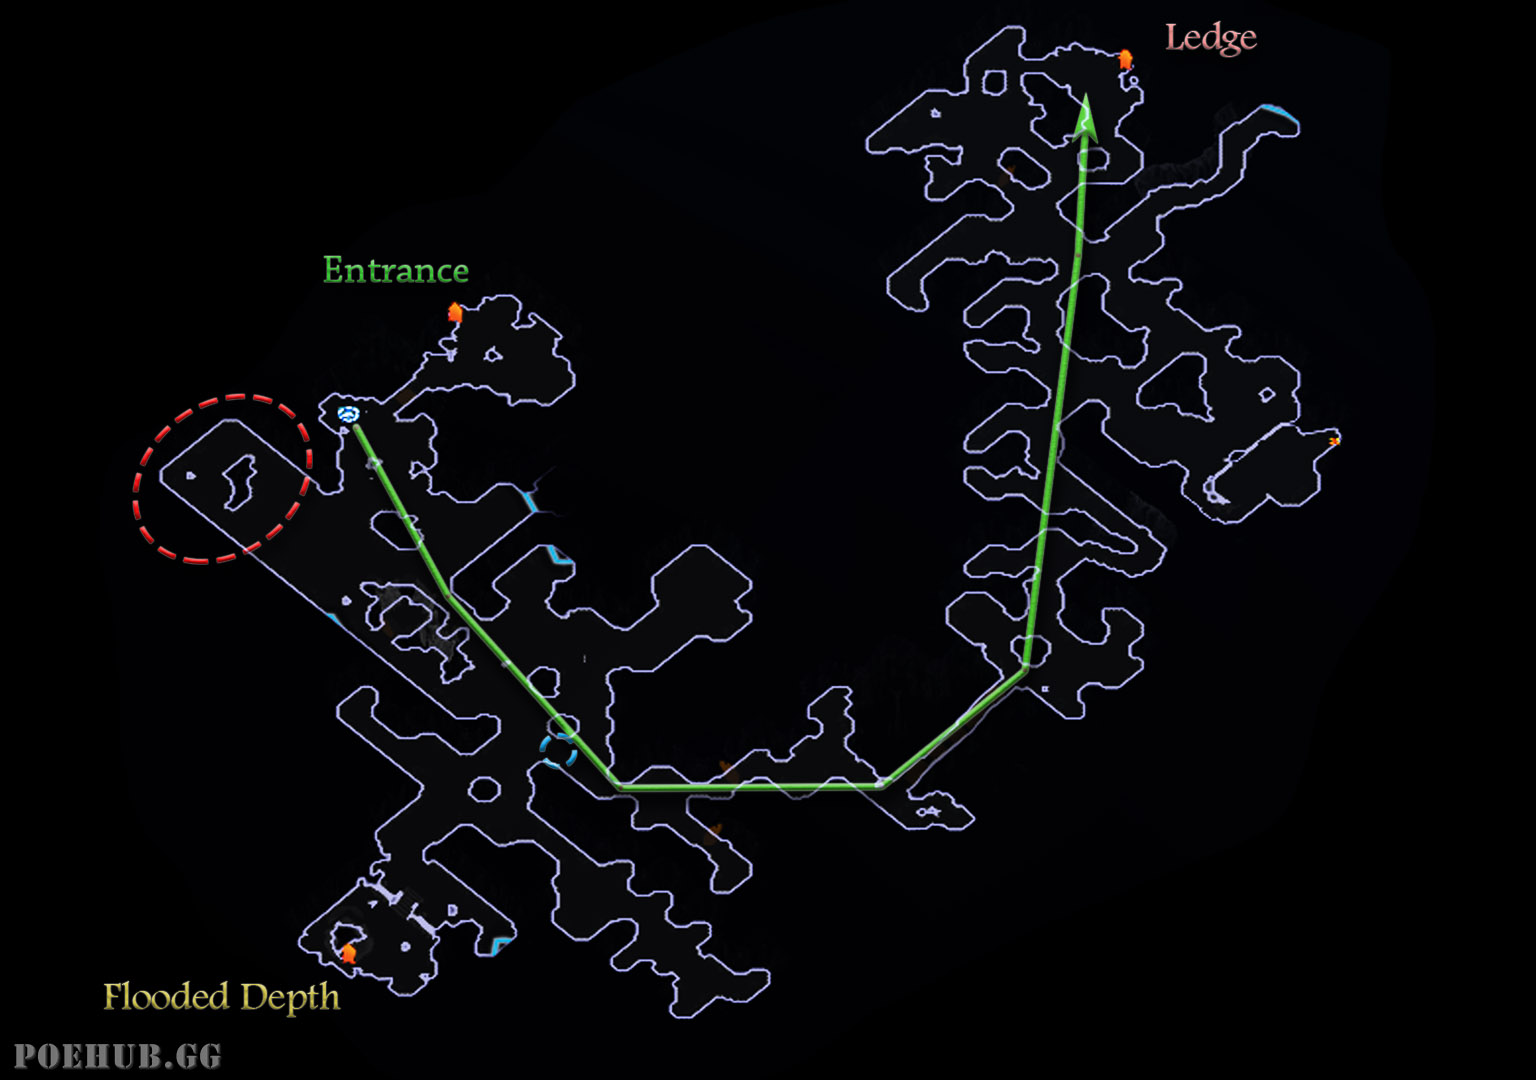
- Unlike in the Bottom layout, in the Right layout there is always something behind to the South-West of the waypoint room (left image, red circle) and/or the waypoint room opens up much more than just to the South-East (right image).
- From here you travel towards South-East and turn towards East after a while of travelling.
- If you recognize this layout well, you can open the portal before you actually see the staircase.
- After stairs, go North.
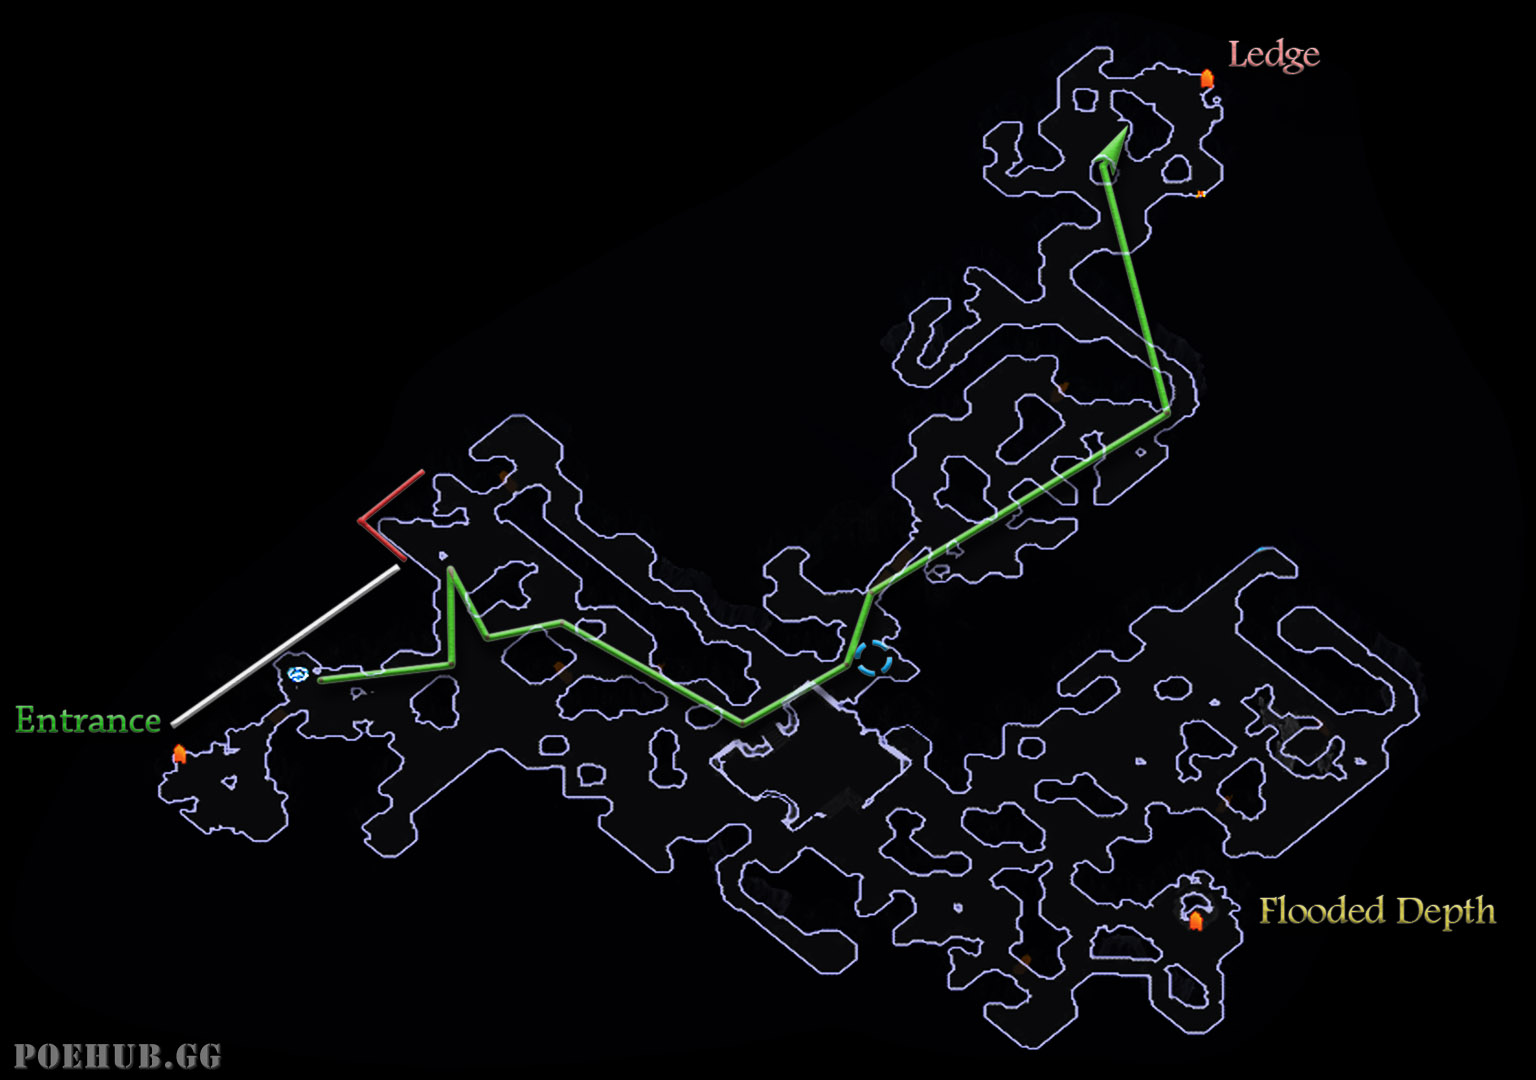
# Left
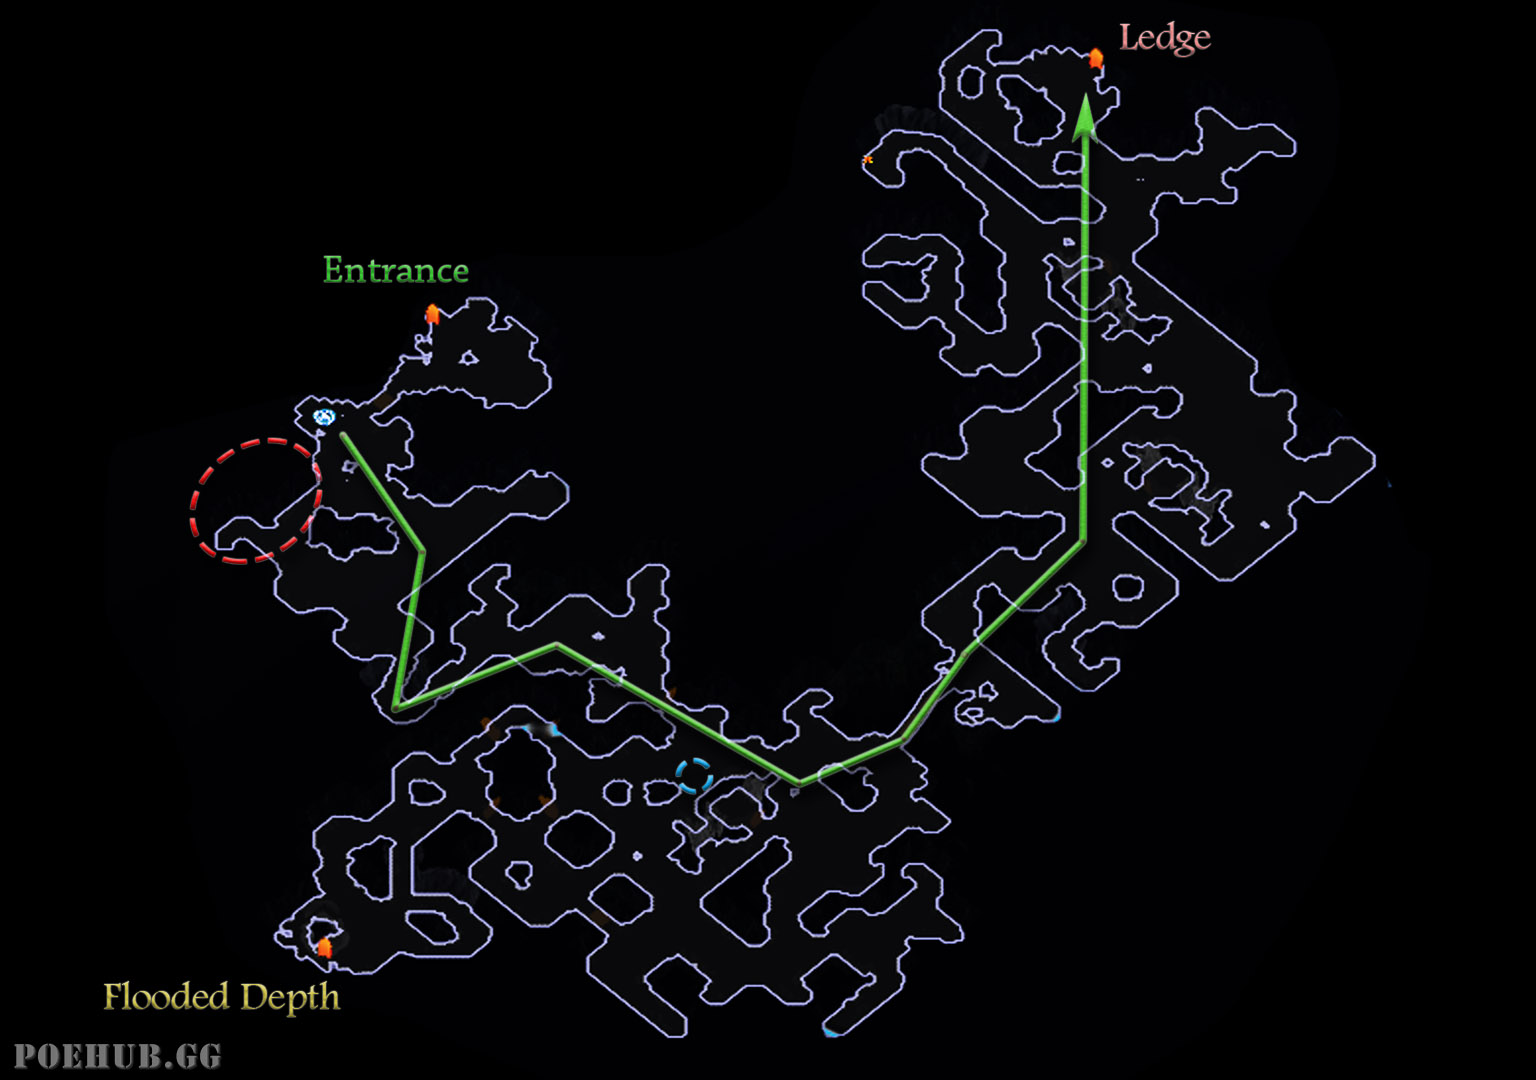
(Above)Left layout is named based on the exit being to the West of the entrance. Stairs in this layout are always towards North-West.
- Unlike in the other above layouts, you will very shortly realize you can't travel South-East in the layout. You will be able to scout this without actually hitting the wall by paying enough attention to your minimap, but it isn't a big deal to run to it.
- Alternatively you can always clear the "above" layouts by hugging the waypoint room to left and if it opens up to the West you know it's this layout. You run the risk of running to annoying dead ends with this though if you're not well aware of how the layout generates, so I wouldn't recommend it without some actual practice in recognizing the differences between these starting zones.
- After you've done your turn towards North-West, if you encounter a Y / T crossroads where you have to commit to one side, open a portal at that spot and take the Southern path, as the Northern path always leads to The Flooded Depths and is sometimes not connected to the staircase.
- After stairs, go North.
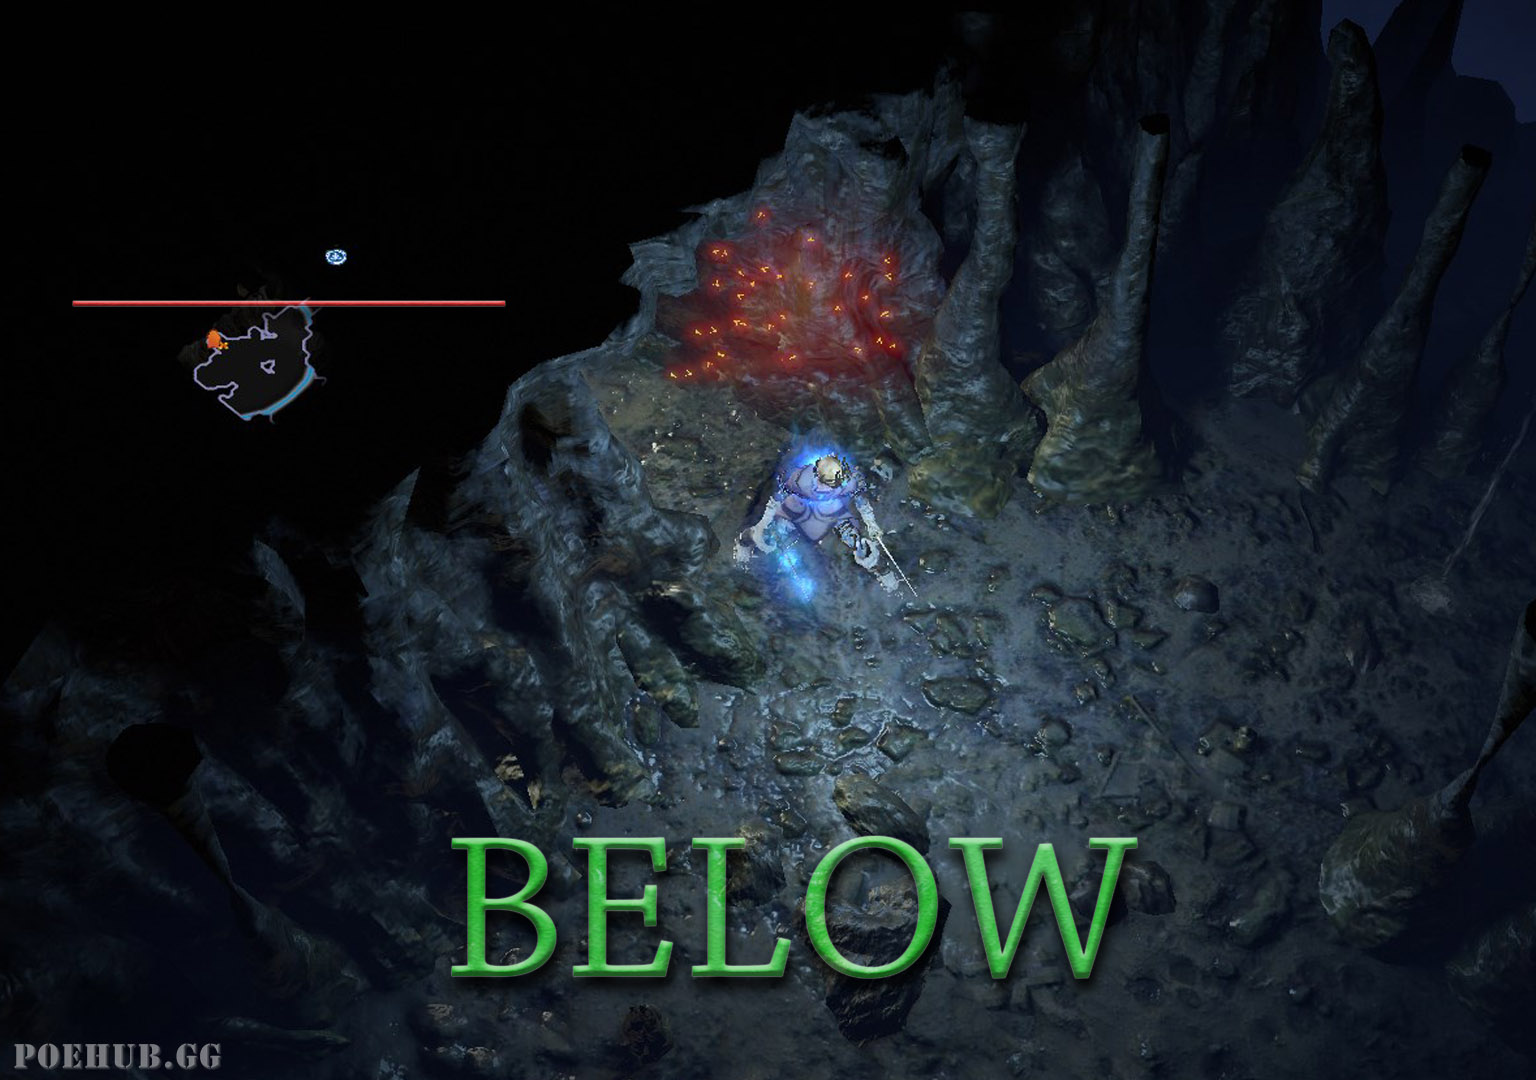
# Below
In the 'below' layouts you want to first check if the area generates towards the North-West as it's a smaller deadend on average compared to checking the bottom generation, and usually you're able to scout it without actually wasting any time or travel.
And here's that we get when starting below the waypoint:
- Left
- Top
- Right
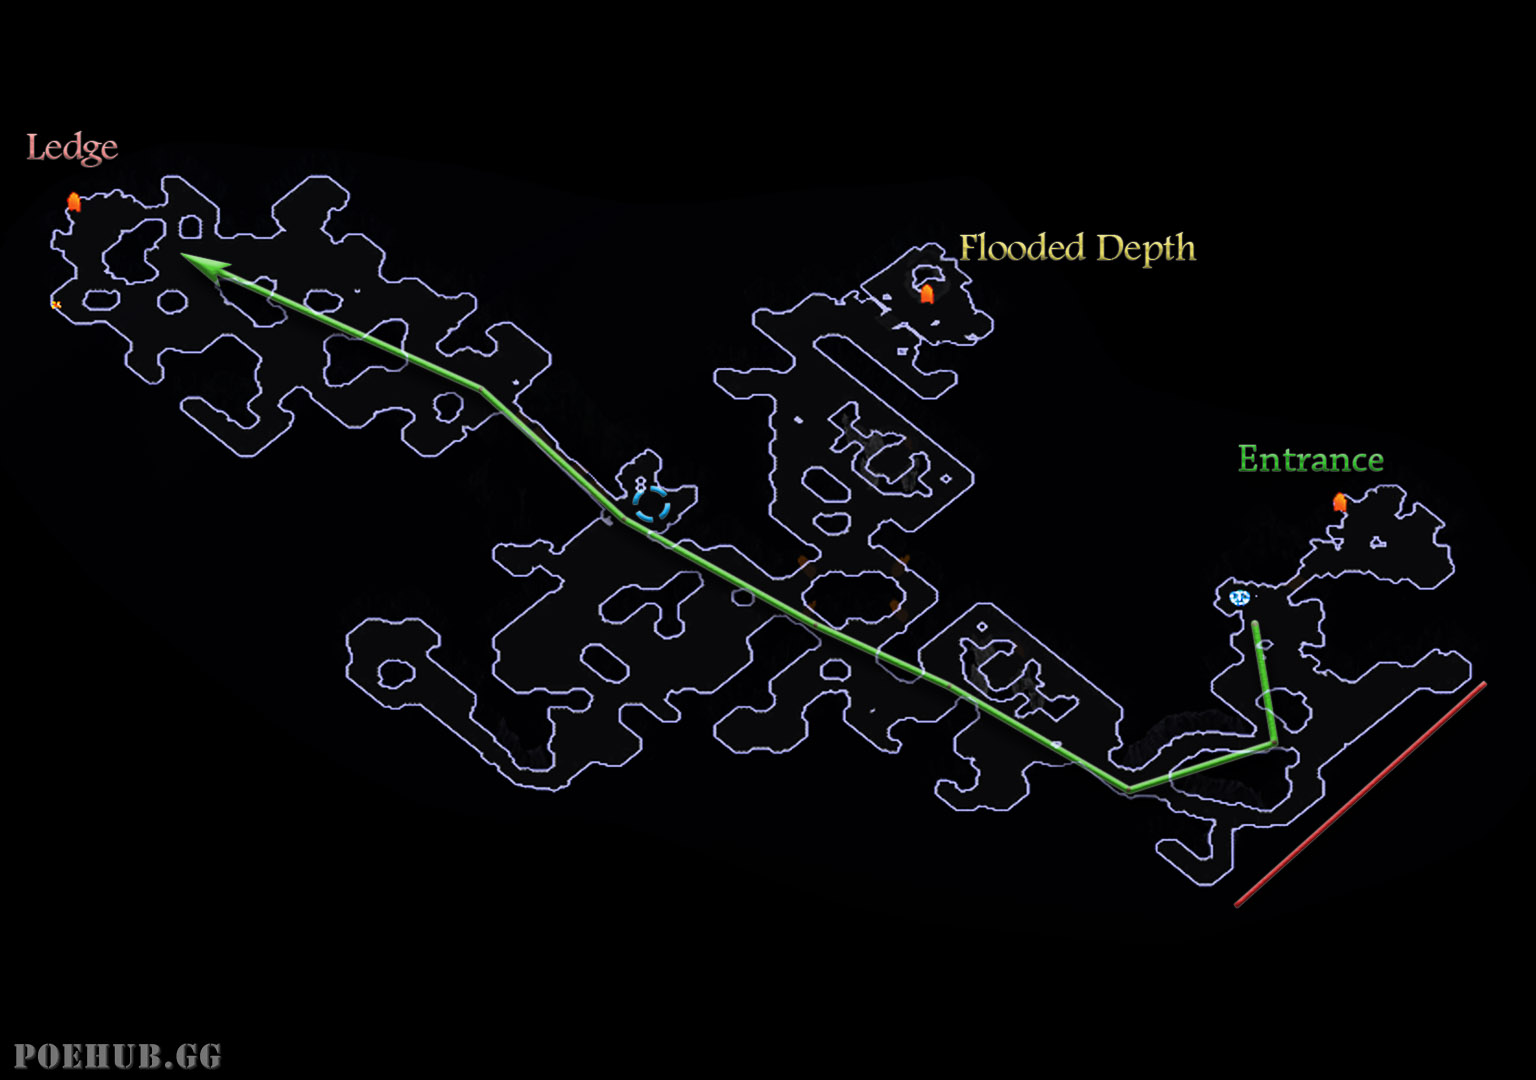
# Left
(Below)Left layout is named based on the exit being to the North-West of the entrance. Stairs in this layout are always towards North-West.
- If the waypoint room isn't concealed (forces you to travel directly South-East) you should always check if the area keeps generating past the white line.
- From there you travel North-West (stay on the left side instead going to the right side)
- This way you very often can actually see the entrance to The Flooded Depths and you know to open a portal, but you can always wait until you see the stairs later.
- After stairs, go North-West
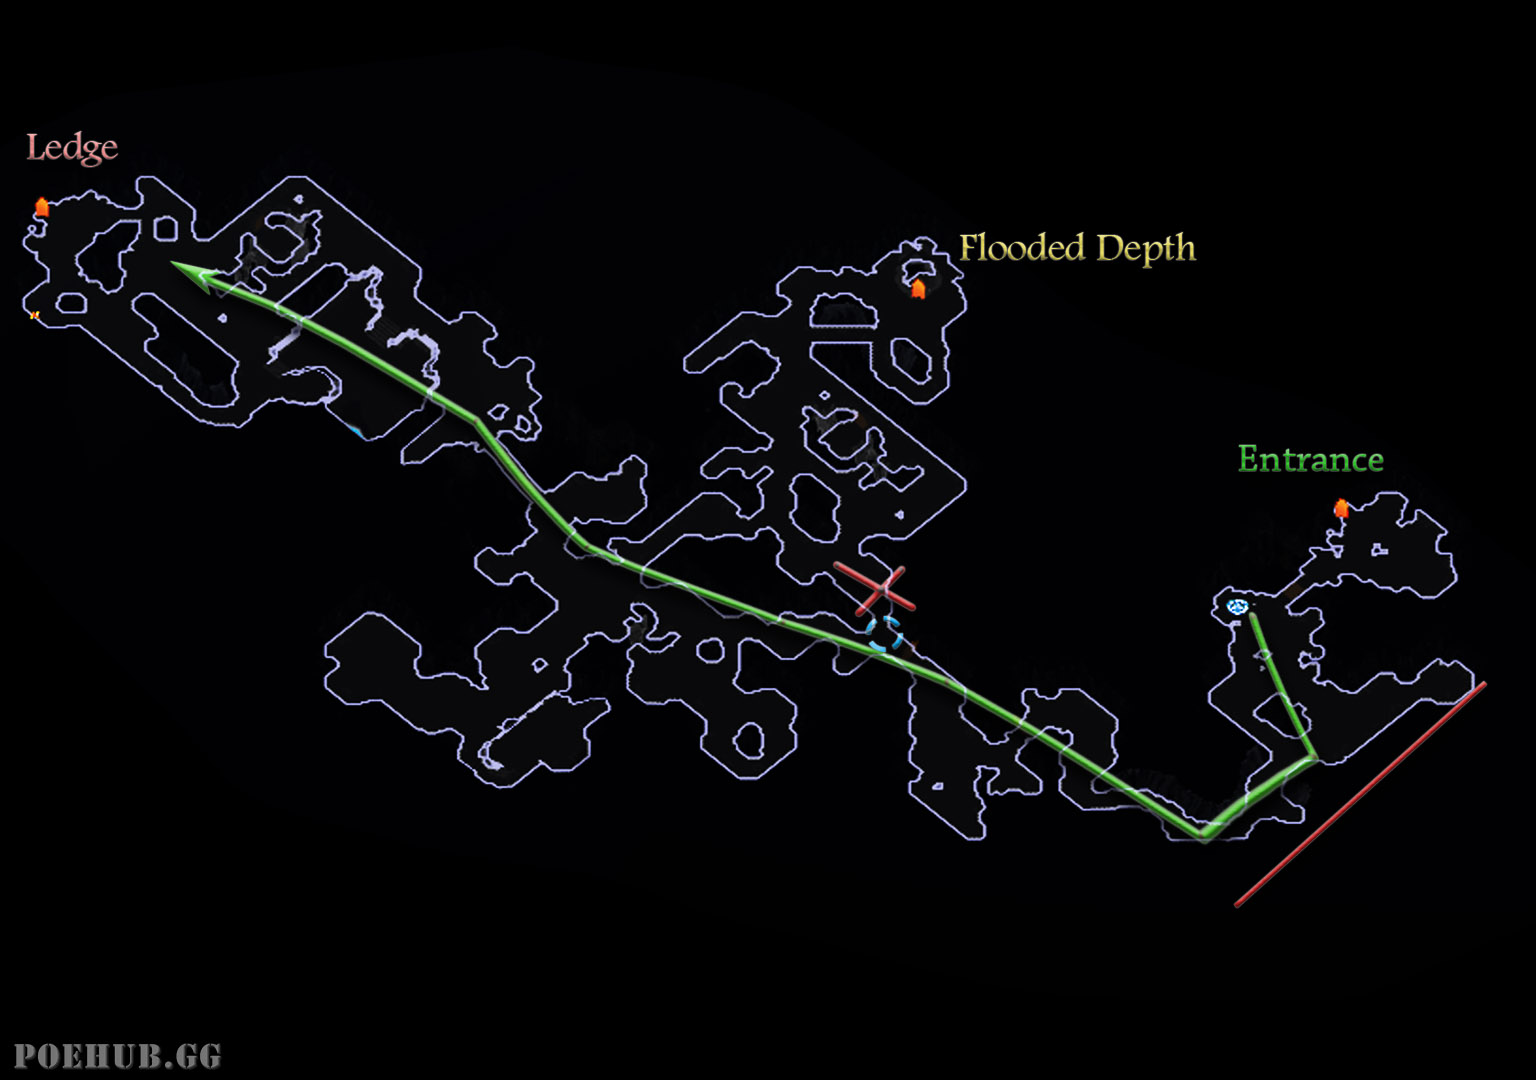
# Top
(Below)Top layout is named based on the exit being to the North-East of the entrance. Stairs in this layout are always towards North-East.
- Just like in the Left layout, you want to check if the area generates towards North-West first. if it doesn't, do not keep hugging the wall towards North-East but instead make a full turn around towards South-East, as quite often the top North room doesn't connect and you end up running to a deadend.
- If you recognize the exact waypoint room as shown in the right side image, you can skip scouting for the North-West continuation and instead just immediately start going towards East.
- Once you've taken the pathing towards East, you should be scouting the opening towards North-East staircase.
- Once you see it, you can open a portal for The Flooded Depths.
- After stairs just keep heading towards North, usually slightly tilted to East.
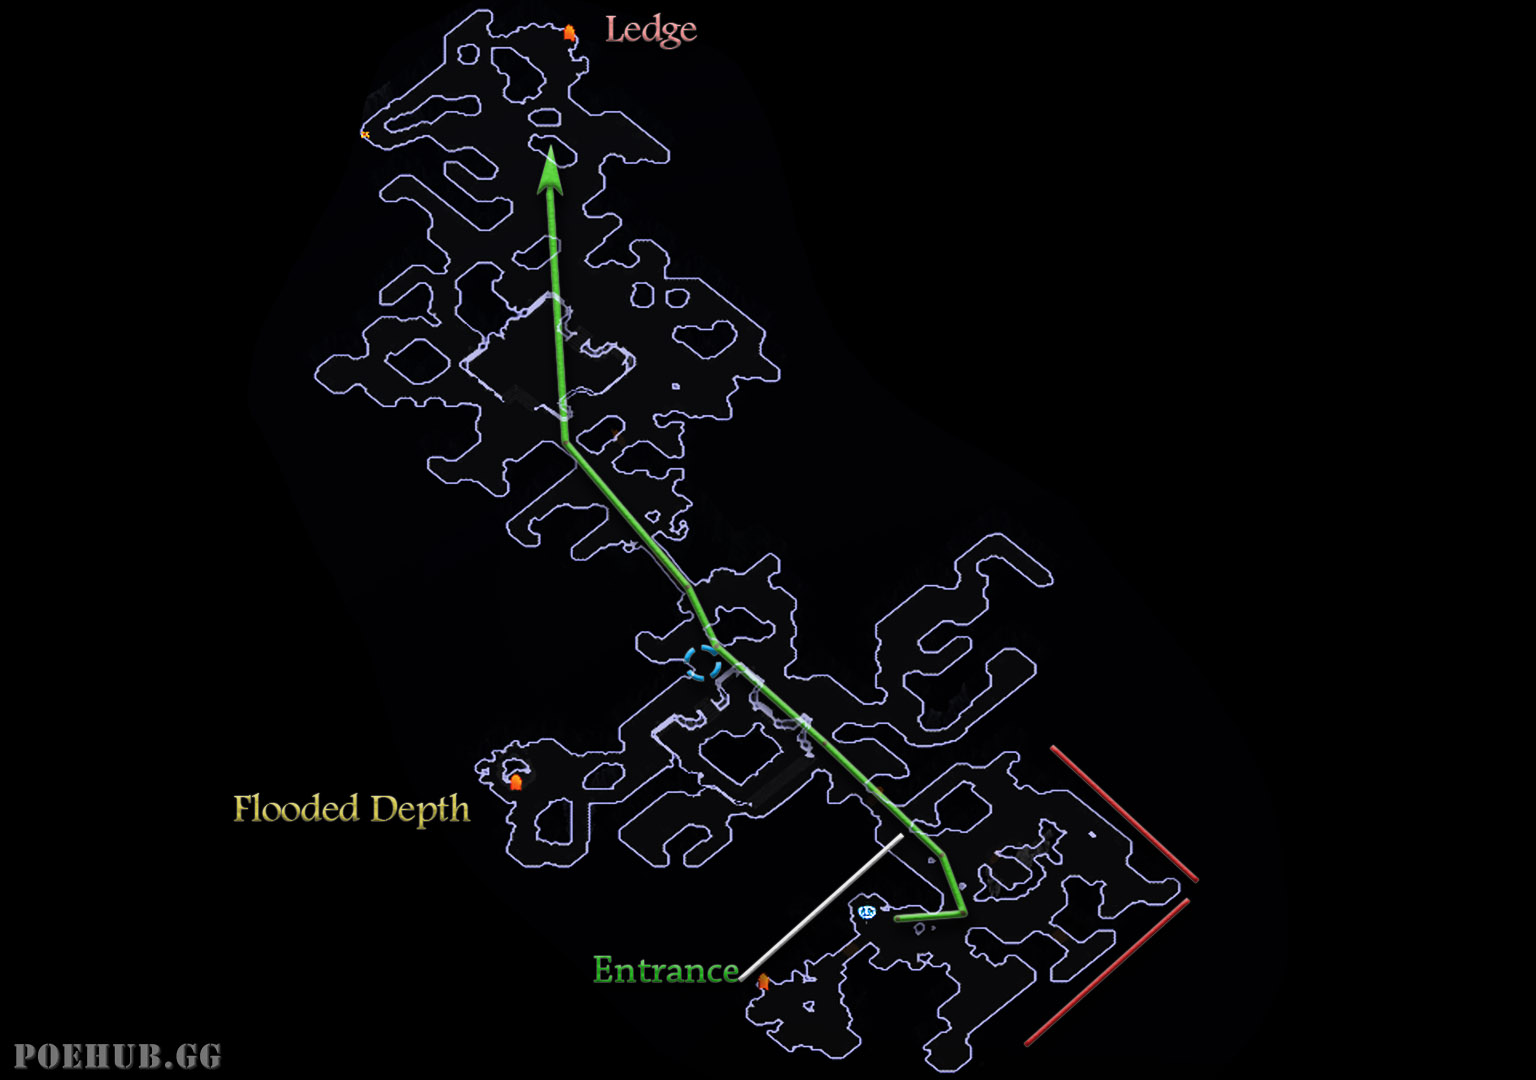
# Right
(Below)Right layout is named based on the exit being to the East of the entrance. Stairs in this layout are always towards South-East.
- You start clearing the Right layout exactly the same way you the Top layout.
- Once you notice that the wall doesn't open up towards North-East early during the area, you know to turn towards South-East
- once you get the feel for the distance in this area, you will never have to run to the deadend that is shown in the layout on the left side of the image.
- By clearing the Top and Right layouts in this way, you will never have to run to the massive dead ends to the right side of the instance in the Top layouts or never miss the opening in the Top layouts.
# Cheatsheet
Work in progress